Spacious Outbuilding Architecture Drafts 24 x 16 : Correct Steps For Putting together a Garden Shed
Cut components at right dimensions. In fact, if you go against the restriction and build it anyway, they may even try to sue you. It shows you how to frame it, use your imagination. It is very important to have it all level or at least slightly slopped in one direction. Work with the smallest dimension if the height or width varies along planned wall space. Cut components at the right dimensions, making sure you (https://shedblueprintsdiy.com/shed-plans-blueprints) follow the information from the plans. Once roof is complete, slice holes for the windows and recessed storage boxes. Making entire front of house open was only way to get a big door that would let me bring a lawnmower in and out and still maintaining the miniature look of house.
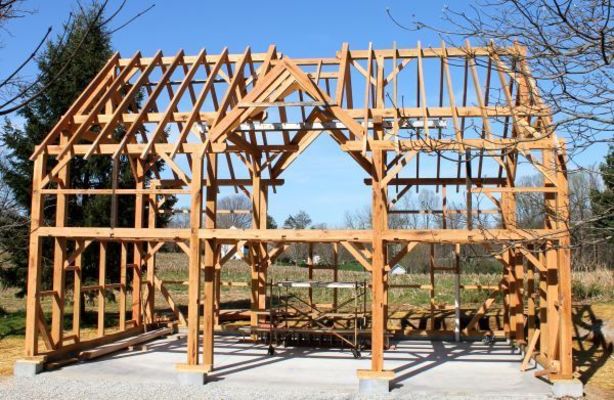
In cold Northern climates like ours, deep footings are required to prevent frost heaving. Using the same template eliminates graduated errors. Use pressure treated, or green wood, for the bottom plate. Gravel is a great option for those who want excellent water drainage and a clean look. Although it is definitely quickest and cheapest option, sticking your shed straight on the dirt definitely has its cons. Common garrets are full-length girders that extend all the way from the ridge to the exterior walls of the building. Opt for a barn outbuilding if you require more headspace, without necessarily having a bigger shed.
The other vertical side passes the platform in the middle of rope, so a simple clamp would keep it locked in place. All siding should be fastened in place with non-corrosive fasteners. If you're making this with new material, the thickness is not critical. Doors, windows and other openings (look at here) are framed with horizontal supports called headers, set inside studs. Therefore, check if walls are plumb and sure top plates are perfectly level. Both products are great and should last a long time. The pitch of roof determines the roofing material you can use. The stucco is a hard surface to paint it may require several coats of primer and several coats of paint to craft sure you've gotten into all the nooks and crannies.
Processing video...
Therefore, we recommend you to fill the holes with timber putty and the smooth surface with sandpaper before applying a few coats of paint. Next, set a floor panel at the corner of the frame, flush to the edges. That would be where you make the door so that you don't introduce any strange warping. Take accurate measurements and adjust size of sheets at the right size by using a circular saw. The goal here is to have trusses perfectly secure, upright and fastened for the next key stage of framing plan. Remember to rip a slight bevel on the lower edge of subfascia so soffit boards will fit tight to the rafter tails.
You may need somebody to help hold them in place while you nail. Plan your truss layout on a sheet of graph paper, noting the gable ends at either end of the roof and the location of chimney opening. Neighbors have helped process by dropping off any beach treasures they find on their walks. There are anchor kits that screw or hammer into the ground with heavy cables to thread through holes in skids so it can't move, or move far. Windows of all shapes and sizes could be found at recycle centers or you can even just do what we did and inset a sheet of clear Polycarbonate multi-wall siding.
Measure and slice four rows of blocking to fit between the rafters. Nail jambs directly to the framing, with the outside edge of each jamb flush to the face of siding. We used inexpensive standard framing lumber for the beams and corner boards, and coated it with a super-durable finish to give it a rich, rustic appearance. Use this information at your own risk. Once you are have finished the red tape requirements, you can get started. You may use solid full depth bridging, lumber or metal diagonal bridging, or other means to provide required floor joist bridging. Lift frames and fit them to floor of small shed, making sure the edges are aligned properly and there are no gaps between components.
In that position, it'll be much easier to step into shed since door's threshold will be closer to the ground. There are many ways to do this. The first is siding panels laid face down for a decorative ceiling. The members shown in roof frame plan are the side wall top plates, the front and rear wall raking top plates, middle rafters, the collar ties and the ridge blocking.